|
Author: Skip
|

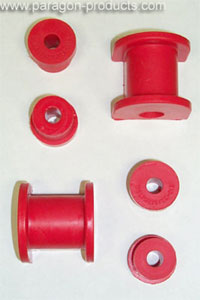
Weltmeister has produced several aftermarket solutions to Porsche suspensions for many years. This bushing kit is a replacement for the original equipment rubber, and also the second generation of material used for such. The first, Poly-Graphite, proved too brittle for the type of forces applied to the front control arms. This new material, manufactured with poly-preservatives, is much stiffer than stock but still pliable enough not to erode from the extremes of daily use.
While this article deals specifically with the early model's steel arms, Weltmeister bushing replacements are also available for the front portion of the aluminum control arms. This is a particularly useful item to late models as the only way to replace the front bushing is to purchase a new or rebuilt control arm - the original bushings are |
| Parts: Weltmeister Bushing Kit (PB-1020 rear of control arm for the front of control arm MC-2501) - for use with steel control arms (The Weltmeister front bushing is no longer available.) |
 |
| Lift Car: Safely lift the front of the car (or whole car), place on jack stands. Remove front wheels.
Disconnect Stabilizer: The stabilizer should be set to the loaded position before attempting to remove the end-link/drop-links. To accomplish this, use two jacks to lift the arms equally - or, do one side using a single jack, then the other. This illustration shows a modified steel arm using a late model drop-link. Most steel arms will use the older bushing clamp secured from the bottom. |
 |
| Disconnect ball-joint: The bolt must be completely removed for the ball-joint to release from the steering knuckle. Be ready to support the strut assembly, as it will be connected only to the tower and tie-rod. (17mm, 37ftlbs) |
 |
| Remove Bushing Clamp: Mark the position of the rear clamp prior to removal - this will allow you to retain the previous caster setting. (17mm, 34ftlbs) |
 |
| Remove Bolt: A little persuasion may be needed to remove the bolt from the bushing. Take care not to damage the bolt threads. With all other connections now removed, the arm will be loose and completely free once this bolt is out. (19mm, 48ftlbs) |
 |
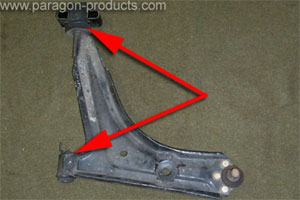
| Remove Bushings: Have fun here - just be careful to not mar the arm too much. The front will pop out with a few whacks from a hammer and large punch. The rear is a press fit, and quite difficult to remove. You may be able to beat it off with a hammer. If not, slice through the rubber and use a Dremel or similar cutting device to spit the metal collar - take care not to cut the arm pin too badly. |
 |
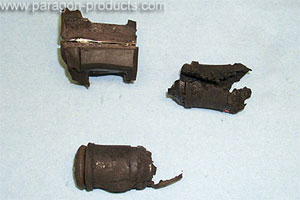
| Why are we doing this again?: Well, in my case, this was the second set of OE rubber bushing in less than a year. Yes, I track the car, but that's no excuse for this sort of sure and frequent failure. The torn front bushing actually fell out of the arm. The bloated and torn front bushing is the other side from same car. The sliced and cut rear bushing was a bit stubborn - knife cut the rubber, rotary cut the collar, pops right off. |
 |
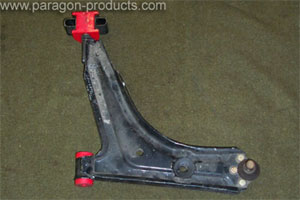
| Install New Bushings: The fronts pop right in, no magic. The rear fits into the clamp, then slides over the arm pin. It's quite a loose fit statically, but once installed they are quite tight. |
 |
| "Installation is the Reverse of Removal": Truer words were never spoken. Aligning the stabilizer is a bit of a chore unless you do it frequently - have patience (and a helper). DO NOT torque the crossmember bolt to 48ftlbs as the original was. While a specific torque cannot be easily given to suit all applications, I'd stay around the 35ftlbs area. The Weltmeister bushing material is not steel reinforced as the OE rubber was - over torque will squeeze the bushing and possibly cause damage to the aluminum crossmember and significantly reduce the life of the bushing.
It is highly recommended that you replace the lock nuts (crimp style) with new when replacing the front bushings. With the decreased ability to properly torque the crossmember bolts, this will add some security that the nuts will not work loose. |
 |
Credits: Skip Grehan
| Related Articles |
> Window Express Kit Installation
> AC Delete
> Accusump Installation
> Adjustable Ride Height Kit - Paragon
> Alternator Replacement
> Brakes, front - 924S, 944, 944S
> Brey-Krause Strut Brace Installation - 944
> Camber Plate Installation (Paragon)
> Clock/Bulb Replacement, digital, Late 944 and 968
> Clutch Replacement - Part One
> Clutch Replacement - Part Two
> Clutch Slave Bleeder Valve Remote
> Control Arm, Front - Info
> Coolant Flush
> DME Chip Installation
> Dash Replacement
> Engine Identification
> Engine Production
> Fuel Level Sender
> KLA Strut Brace Installation - 924S, 944, 968
> Koni Strut Conversion - 8641-1414S for late 944, 968
> Motor Mount Replacement
> Odometer Gear Replacement - late 944
> Oil Cooling, Auxiliary
> Oil Pressure Relief Valve
> Oil Pressure Sending Unit Replacement
> Rear Ride Height Adjustment
> Porsche Chronology
> Rear Spring Rates vs. Effective Rates
> Rear Wheel Bearing Diagnosis
> Rear Wheel Bearing Replacement - 924, early 944
> Rear Wheel Bearing Replacement - late 944, 968
> Ride Height Measurement
> Rod Bearing Replacement
> Shift Lever Rebuild
> Short Shift Kit
> Throttle Position Sensor
> Sway Bars - Info
> Torque Tube Rebuild
> Torsion Bar Replacement
> Transaxle Fluid - Info
> Transaxle Fluid Change
> Rear Sway Bar Installation
> Transaxle Replacement
> Heater Clip
> Window Regulator Replacement
> Seat Back Brace Installation Instructions
> KLA Strut Brace Installation - 968/944 S2/944 S
|
|


